
- Setup
- User Guide
- Developer Guide
- Inner workings
- Common issues
- Other issues
Setup
Quick Start
- Simply download from one of the following sources:
- Run the executable. No installation is nessesary.
Unified Store Setup
Super Grate fully supports unification of its components, such as:
- Backup Store
- Configuration
- USMT Configuration
- Logging
Achieve this by using UNC paths. Place SuperGrate.exe on a shared folder, configure settings, and set permissions.
User guide
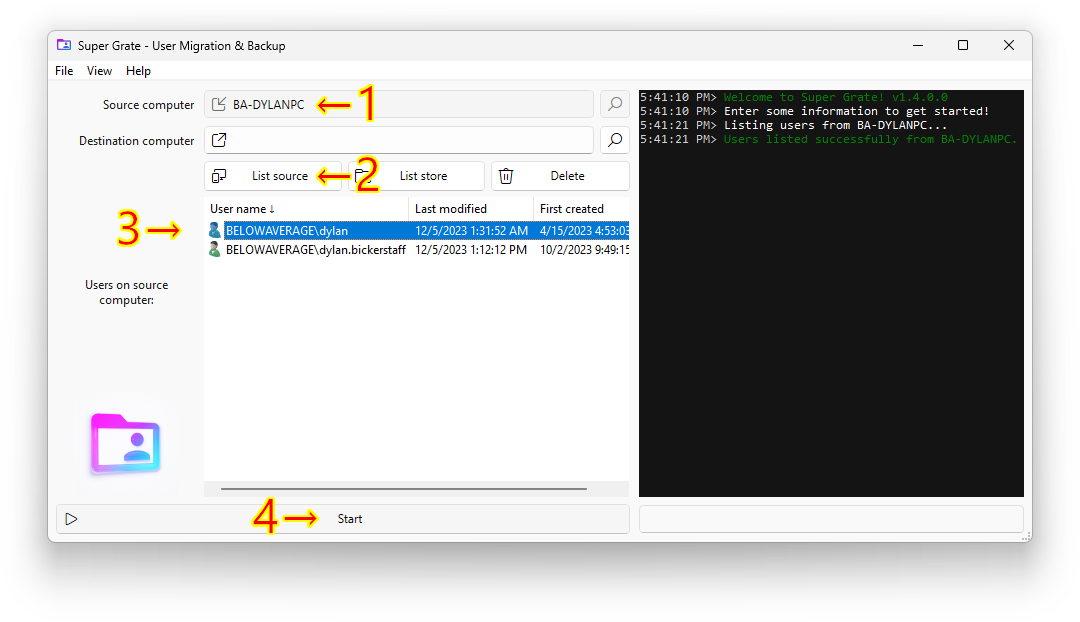
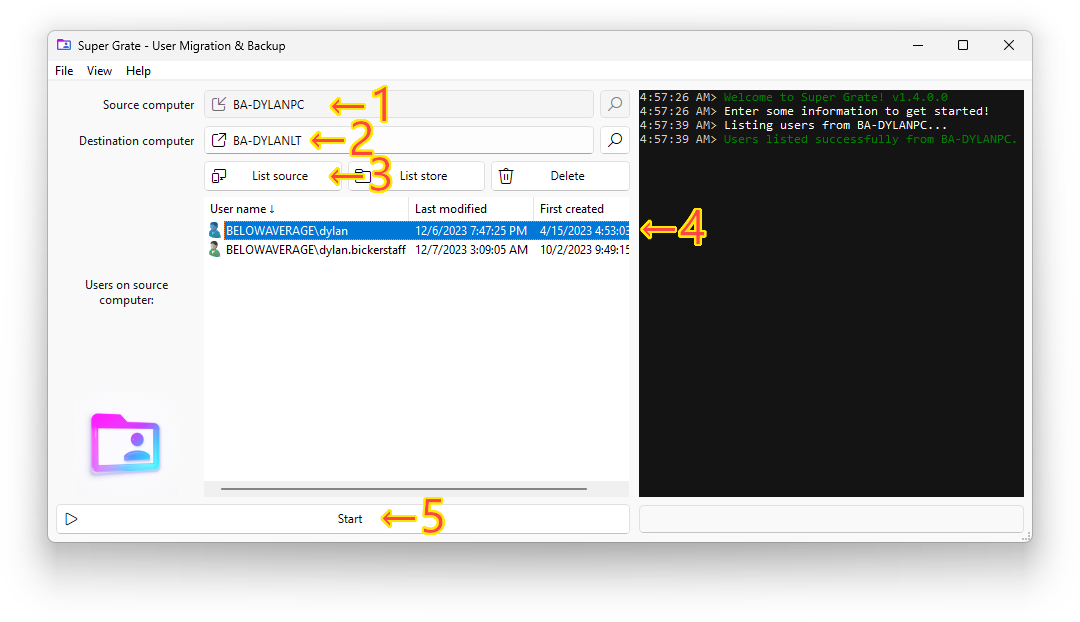
Backing up a User Profile
- Enter the source computer’s hostname.
- Optionally, enter a destination computer for a full migration.
- Click “List source” to view user profiles.
- Select user(s) to back up.
- Click “Start.”
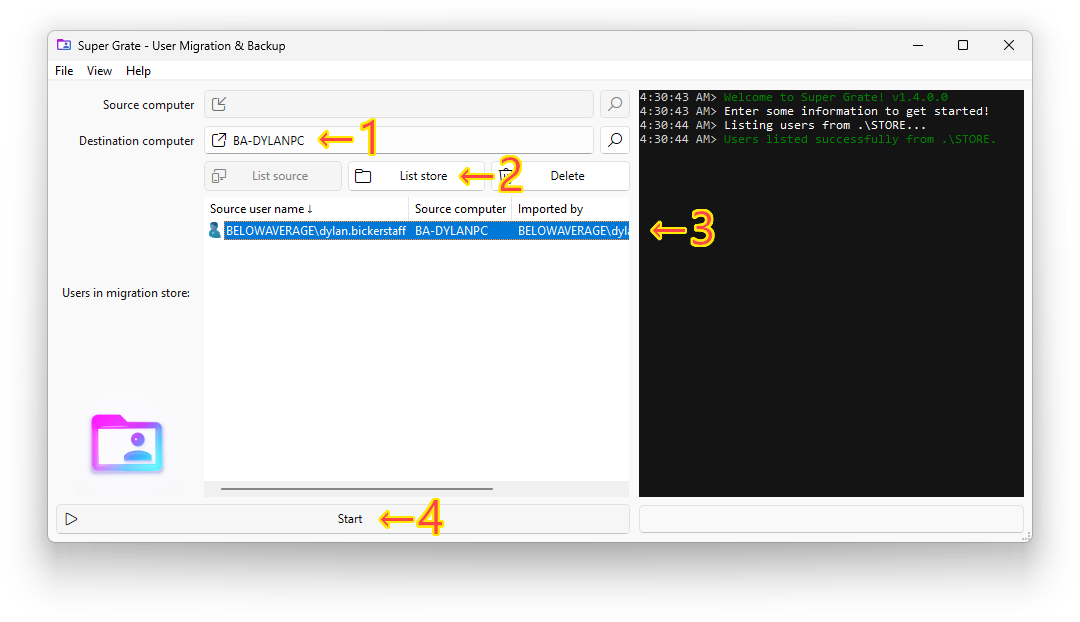
Restoring a User Profile
Restoring a user profile is just as easy as Backing up a User Profile.
- Enter a Computer’s Host-name in the “Destination Computer” text box.
- Press “List Store” to display a list of Profiles available in the Backup Store.
- Select the Users you would like to restore to the “Destination Computer”.
- Press “Start”.
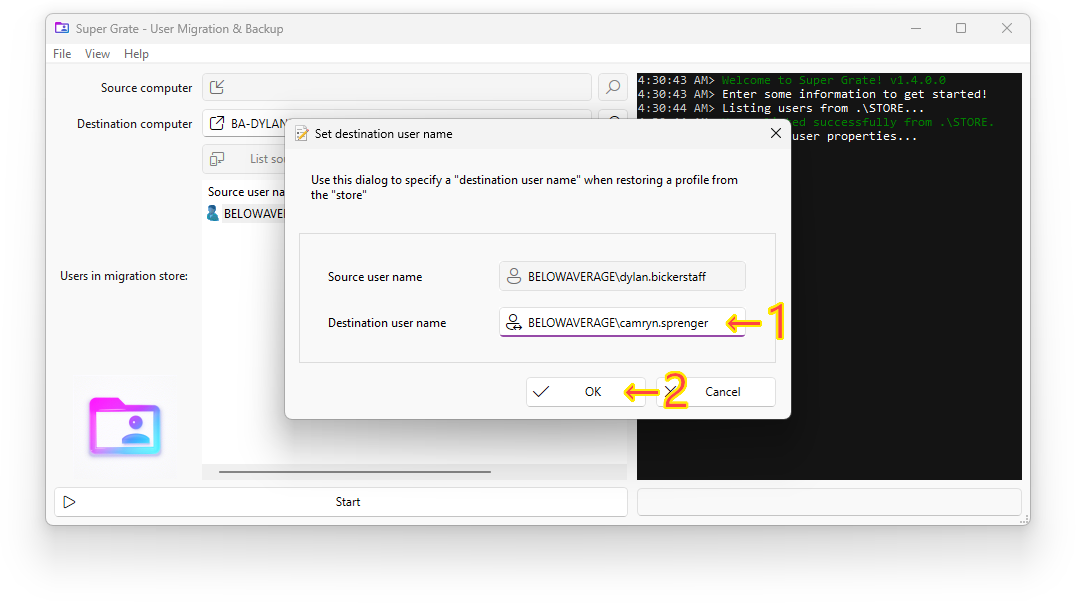
Rename User (Optional)
To restore a user profile with a different domain or username:
- In the store, right-click the user.
- Select “Set destination username.”
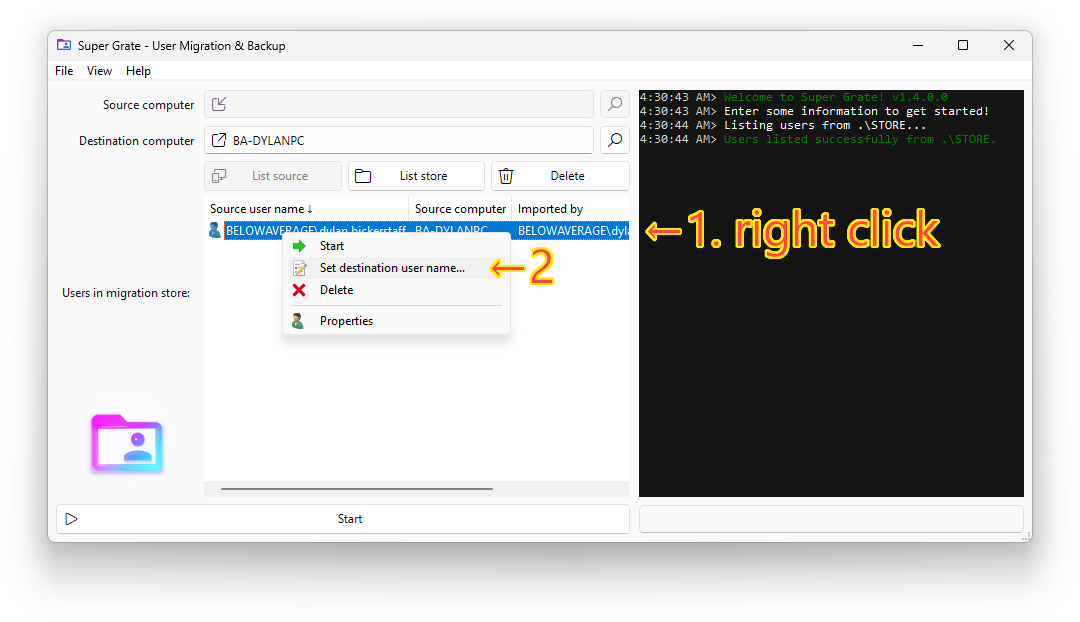
- Enter the new domain\username.
- Click “OK.”
Performing a Full Migration
In a comprehensive Super Grate operation known as a “full migration,” both the “Source Computer” and “Destination Computer” fields are specified. When initiating the backup/migration process, Super Grate performs the following steps: it backs up the chosen user profiles from the “Source Computer” to the designated store. Subsequently, it establishes a connection to the “Destination Computer” and applies the user profiles that were initially selected from the “Source Computer.” This seamless sequence ensures the efficient transfer and restoration of user profiles between the specified source and destination computers.
- Enter the source computer name.
- Enter the destination computer name.
- Click “List source” to view user list.
- Select user to migrate.
- Click “Start.”
Deleting a Profile on a Source Computer
- Enter the source computer’s name.
- Click “List source.”
- Select user profile(s) to delete.
- Click “Delete” and confirm.
Deleting a Profile from the Store
- Click “List store.”
- Select profile(s) to delete.
- Click “Delete” and confirm.
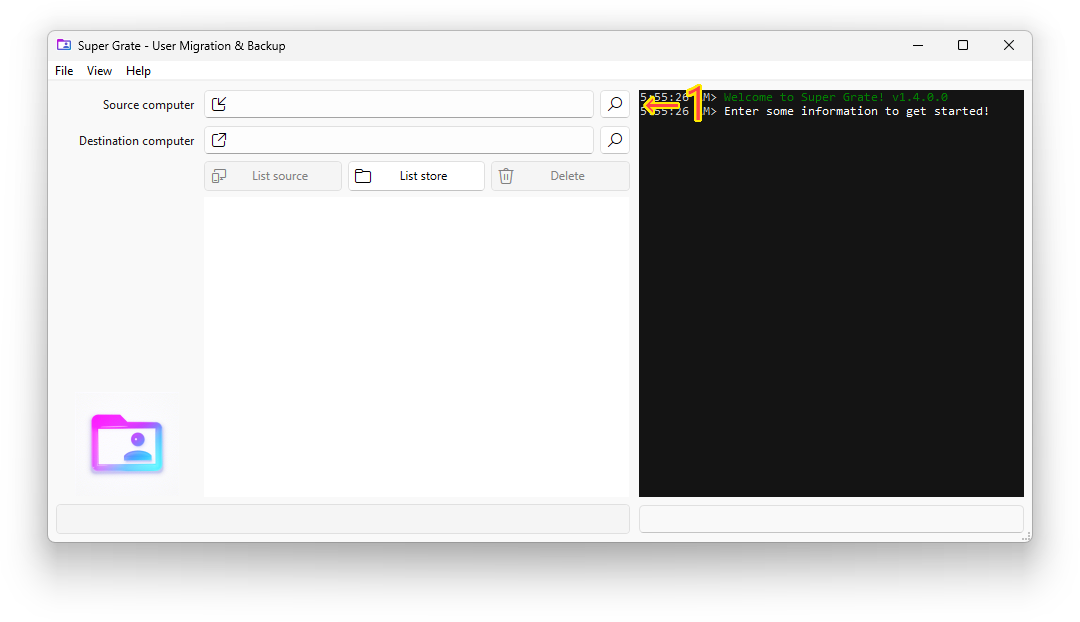
Using Active Directory for Computer Selection
Super Grate simplifies computer selection by integrating seamlessly with Active Directory. Follow these steps to efficiently choose a computer using the Active Directory feature:
- Click the magnifying glass icon in the “Source Computer” or “Destination Computer” field.
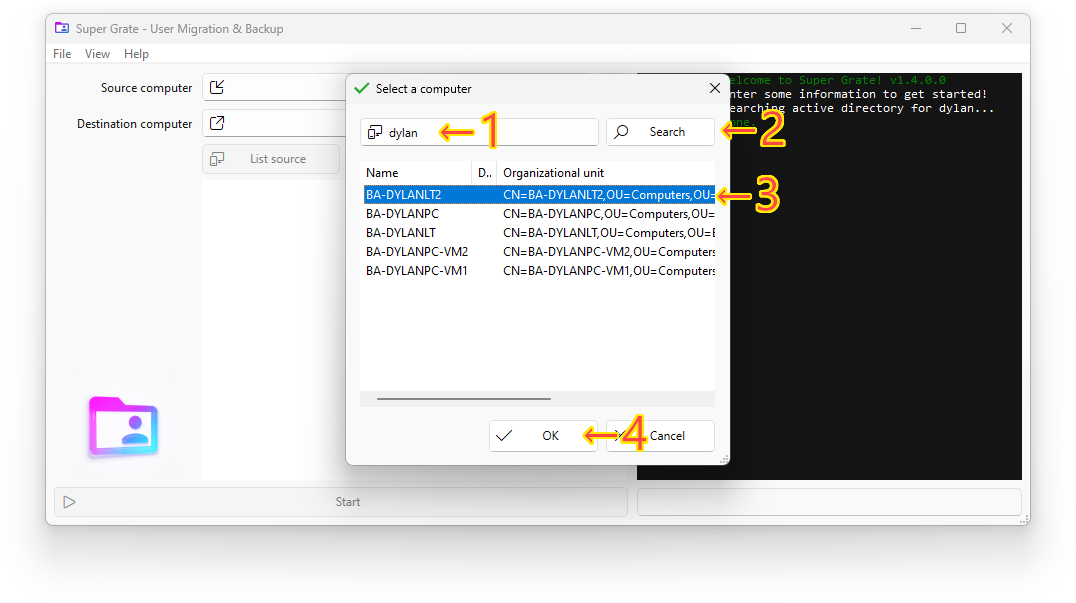
- Enter any criteria (hostname, description, or OU) into the search field.
- Click the search icon in the dialog or press enter to initiate the filtering process.
- Browse the filtered list and select the desired computer.
- Confirm your selection, and Super Grate automatically populates the computer details in the designated field.
This feature streamlines the computer selection process by leveraging a single search field to filter against hostname, description, and OU. Remember to click the search icon or press enter to apply the filter.
Tip: Enhance efficiency and reduce manual errors by utilizing the Active Directory feature for seamless computer selection within Super Grate.
Customize Columns
- Click “List source” or “List store.”
- Select “View” and then “Add/Remove columns.”
- Adjust columns as needed.
- Save customizations using “File” > “Settings” > “Save to disk.”
Check for Updates
Go to “Help” and select “Check for updates.” Follow the link to GitHub for potential updates.
Command Line Switches
Use CLI switches to customize settings:
C:\>SuperGrate.exe /NameOfSetting:Value
For a list of settings, see: SuperGrate.xml.
1.2.0.0 to 1.3.0.0 Upgrade Guide
Upgrading SuperGrate.xml
- Open the new Super Grate after replacing the old executable.
- Navigate to “File” > “Settings” or press “F12.”
- Click “Save to Disk” to update SuperGrate.xml.
Upgrading the Backup Store
- Download the following PowerShell script from here: store_upgrade_1.2.0.0_1.3.0.0.ps1.
- Copy the script to the SuperGrate directory.
- Execute the script with no errors.
Conclusion
After following these steps, Super Grate should run smoothly.
Developer Guide
Compiling Super Grate
- Download and install Microsoft’s Visual Studio (Community edition).
- Clone the repository using VS’ “Get Started” page.
- Open the solution and press the green “Start/Play” button.
- Select “Batch Build,” check “Release” & “Release_64,” then press “Rebuild.”
Debugging Super Grate
When encountering errors, refer to the logs and use the built-in features for displaying and saving logs.
Inner Workings
Backup Store
The backup store, often referred to as the “store” in Super Grate, is essentially a directory residing on either a shared or local drive. Its primary purpose is to house user profiles after they’ve undergone the backup process. Whether it’s a comprehensive full migration or a straightforward profile backup, the transferred data finds its repository within this designated store. This directory serves as a centralized location for storing and managing the backed-up user profiles, facilitating accessibility and organization regardless of the scale or complexity of the Super Grate operation.
The file structure of the store is as follows:
- Base Folder (Specified in the SuperGrate.xml or Settings Menu)
- User Profile Folder (Named a generic GUID, Can be any name)
- data: A single file containing the backed-up profile.
- destination: A file containing the name of the destination computer where the profile last was exported too.
- exportedby: A file containing the name of the user who last exported the stored user profile.
- exportedon: A file containing the date of when the profile was last exported in windows file time
- importedby: A file containing the name of the user who imported the user profile.
- importedon: A file containing the date of when the profile was imported in windows file time.
- ntaccount: A file containing the name of the user profile that was imported.
- targetntaccount: A file containing the target user name and domain to use when restoring the profile.
- sid: A file containing the SID of the user profile that was imported.
- source: A file containing the name of the source computer the profile originated from.
- User Profile Folder (Named a generic GUID, Can be any name)
SuperGrate.xml
The SuperGrate.xml file is automatically generated if it doesn’t exist in the current working directory. This file plays a crucial role as it encapsulates preferences configured within the “Settings” menu.
<?xml version="1.0" encoding="utf-8"?>
<SuperGrate>
  <!--The UNC or direct path to the USMT directory. (E.g: .\USMT\X64)-->
  <USMTPathX64>.\USMT\X64</USMTPathX64>
  <USMTPathX86>.\USMT\X86</USMTPathX86>
  <!--Local path on source computer where Super Grate will run USMT from. (E.g: C:\SuperGrate)-->
  <SuperGratePayloadPath>C:\SuperGrate</SuperGratePayloadPath>
  <!--The UNC or direct path to the USMT migration store. (E.g: \\ba-share\s$ or .\STORE)-->
  <MigrationStorePath>.\STORE</MigrationStorePath>
  <!--ScanState.exe and LoadState.exe CLI parameters. (See: https://docs.microsoft.com/en-us/windows/deployment/usmt/usmt-command-line-syntax)-->
  <ScanStateParameters>/config:Config_AppsAndSettings.xml /i:MigUser.xml /i:MigSgAdditional.xml /c /r:3 /o</ScanStateParameters>
  <LoadStateParameters>/config:Config_AppsAndSettings.xml /i:MigUser.xml /i:MigSgAdditional.xml /c /r:3 /lac /lae</LoadStateParameters>
  <!--Delete the user from the migration store after a restore? (Store to destination)-->
  <AutoDeleteFromStore>false</AutoDeleteFromStore>
  <!--Delete the user from the source computer after a backup? (Source to store)-->
  <AutoDeleteFromSource>false</AutoDeleteFromSource>
  <!--Prevent NT AUTHORITY and NT SERVICE accounts from being listed?-->
  <HideBuiltInAccounts>true</HideBuiltInAccounts>
  <!--Prevent unknown accounts from being listed?-->
  <HideUnknownSIDs>false</HideUnknownSIDs>
  <!--Write log to disk on exit. (Leave blank to disable) (E.g: \\ba-share\s$\Logs or .\Logs)-->
  <DumpLogHereOnExit>.\LOGS</DumpLogHereOnExit>
  <!--List of columns to display for the source or store users.-->
  <ULSourceColumns>0,3,9</ULSourceColumns>
  <ULStoreColumns>0,1,5,6,4</ULStoreColumns>
  <!--User list view mode. (E.g: Large (0) / Small Icon (2), List (3), Details (1) and Tile (4))-->
  <ULViewMode>1</ULViewMode>
  <!--Default source computer at startup.-->
  <SourceComputer></SourceComputer>
  <!--Default destination computer at startup.-->
  <DestinationComputer></DestinationComputer>
  <!--Default tab view at startup (E.g: Source, Store or None)-->
  <TabView>None</TabView>
  <!--Security protocol version (Restart required) (E.g: SystemDefault, Ssl3, Tls, Tls11, Tls12 or Tls13)-->
  <SecurityProtocol>Tls12</SecurityProtocol>
  <!--Language. (E.g: en)-->
  <Language></Language>
</SuperGrate>Common Issues
WMI (Windows Management Instrumentation)
Super Grate relies on WMI for its operation. If WMI is corrupted or disabled on the remote PC, you may encounter various issues. For instance:
[INFO]<12:11:28 AM> Getting list of users on: BA-DYLANPC...
[ERROR]<12:11:28 AM> The service cannot be started, either because it is disabled or because it has no enabled devices associated with it.

[VERBOSE]<12:11:28 AM> ERROR
   at System.Runtime.InteropServices.Marshal.ThrowExceptionForHRInternal(Int32 errorCode, IntPtr errorInfo)
   at System.Management.ManagementScope.InitializeGuts(Object o)
   at System.Management.ManagementScope.Initialize()
   at SuperGrate.WMI.<>c__DisplayClass0_0.b__0()
[ERROR]<12:11:28 AM> Failed to query via WMI.
[ERROR]<12:11:28 AM> Object reference not set to an instance of an object.
[VERBOSE]<12:11:28 AM> ERROR
   at SuperGrate.Misc.<>c__DisplayClass6_0.<b__0>d.MoveNext()
[ERROR]<12:11:28 AM> Failed to get a list of users. Please make sure that the specified host is valid and online and that you are an administrator of: BA-DYLANPC
To resolve this issue, enable WMI and execute the following command on the remote PC as an administrator: winmgmt /resetrepository
For detailed instructions, refer to the Microsoft documentation: WMI Troubleshooting.
Could Not Find File USMT.MIG
The problem labeled as “could not find file USMT.MIG” can be deceiving. Super Grate attempts to copy the migration file once USMT completes its task. However, upon scrutinizing the log, it becomes evident that USMT never initiated. Between the log entries “Waiting for scanstate to finish…” and “USMT Finished,” there should be USMT-specific output. In this scenario, the error message “Could not find file ‘C:\SuperGrate\USMT\USMT.MIG'” is misleading as it’s a symptom rather than the root cause. The actual issue lies in USMT failing to start, requiring attention to resolve the core problem.
[SUCCESS]<12:19:26 AM> USMT uploaded successfully.
[INFO]<12:19:26 AM> Capturing user state: 'BELOWAVERAGE\dylan' on 'BA-DYLANPC'...
[VERBOSE]<12:19:26 AM> Waiting for scanstate to finish...
[SUCCESS]<12:19:27 AM> USMT Finished.
[INFO]<12:19:30 AM> Uploading user state to the Store...
[ERROR]<12:19:30 AM> Could not find file 'C:\SuperGrate\USMT\USMT.MIG'.
[VERBOSE]<12:19:30 AM> ERROR
   at System.IO.__Error.WinIOError(Int32 errorCode, String maybeFullPath)
   at System.IO.FileInfo.get_Length()
   at SuperGrate.IO.FileOperations.CopyFile(String Source, String Destination)
   at SuperGrate.USMT.<>c__DisplayClass17_0.<<UploadToStore>b__0>d.MoveNext()
[ERROR]<12:19:30 AM> Failed to upload user state to the Store.
[INFO]<12:19:30 AM> Removing USMT from: BA-DYLANPC...
[SUCCESS]<12:19:30 AM> USMT removed successfully.
[INFO]<12:19:30 AM> Done.
When faced with this challenge, it’s advisable to scrutinize the values configured for ScanStateParameters, LoadStateParameters, and SuperGratePayloadPath in the SuperGrate.xml file. Examining these parameters is crucial as they directly influence the execution of the USMT (User State Migration Tool) and the overall functionality of Super Grate. By ensuring that these values are accurately set, you can address the issue at its source and facilitate a smoother operation of the migration process.
As a final troubleshooting measure, consider deleting both the USMT folder and the SuperGrate.xml file, and then restart Super Grate. This action effectively resets Super Grate to its default settings. Upon restarting, Super Grate automatically generates a new SuperGrate.xml file and USMT folder, reverting to the initial configuration. This serves to refresh Super Grate’s settings, potentially resolving persistent issues and providing a clean slate for subsequent operations.